¶ Create Diet
¶ Navigate to the main menu on the left side.
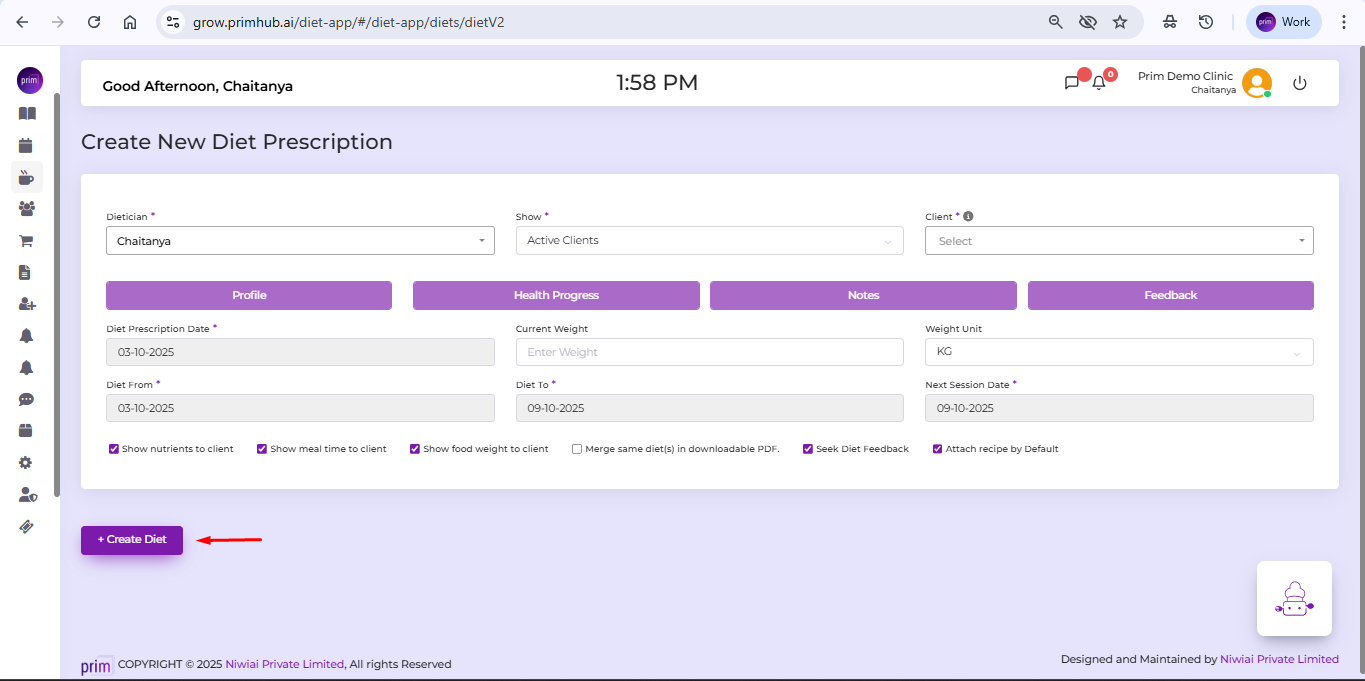
- Click on diets-> Create diet.
- Choose a dietician from the dropdown menu (mandatory).
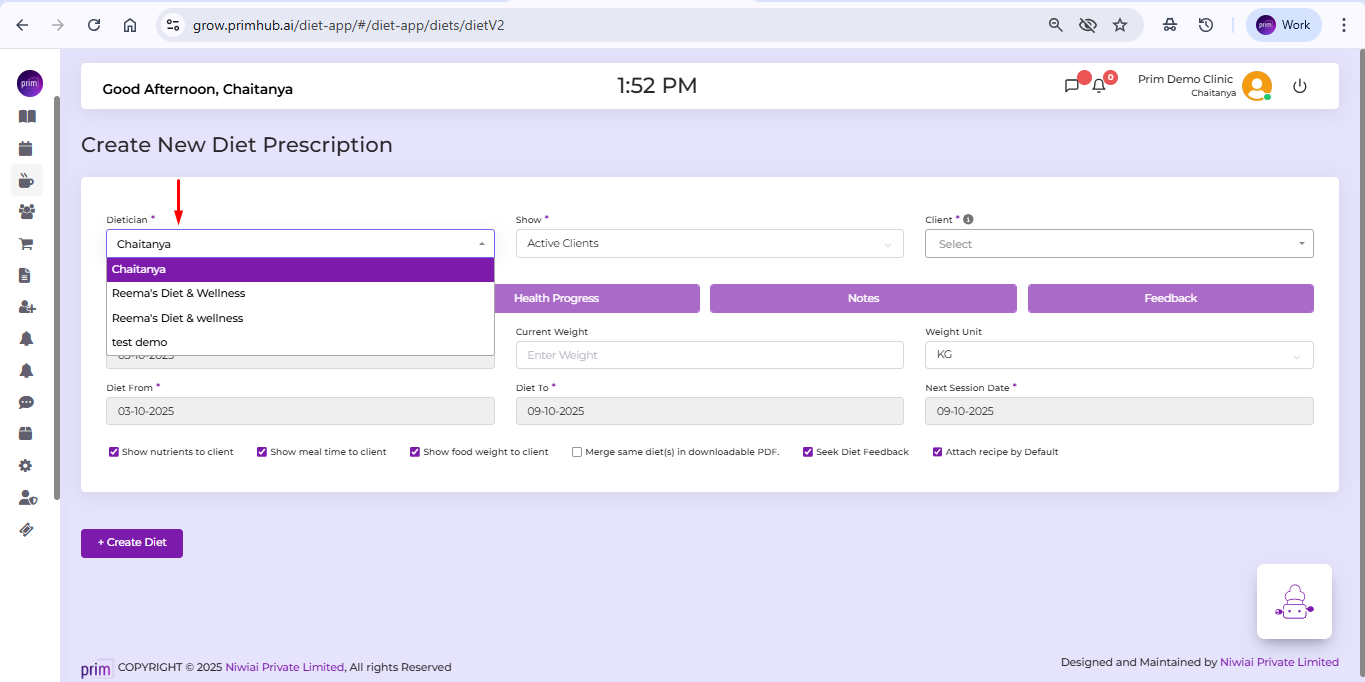
3. Choose show->Active, Discontinue, or All Clients (mandatory).
4. Select the client from the dropdown menu (mandatory).
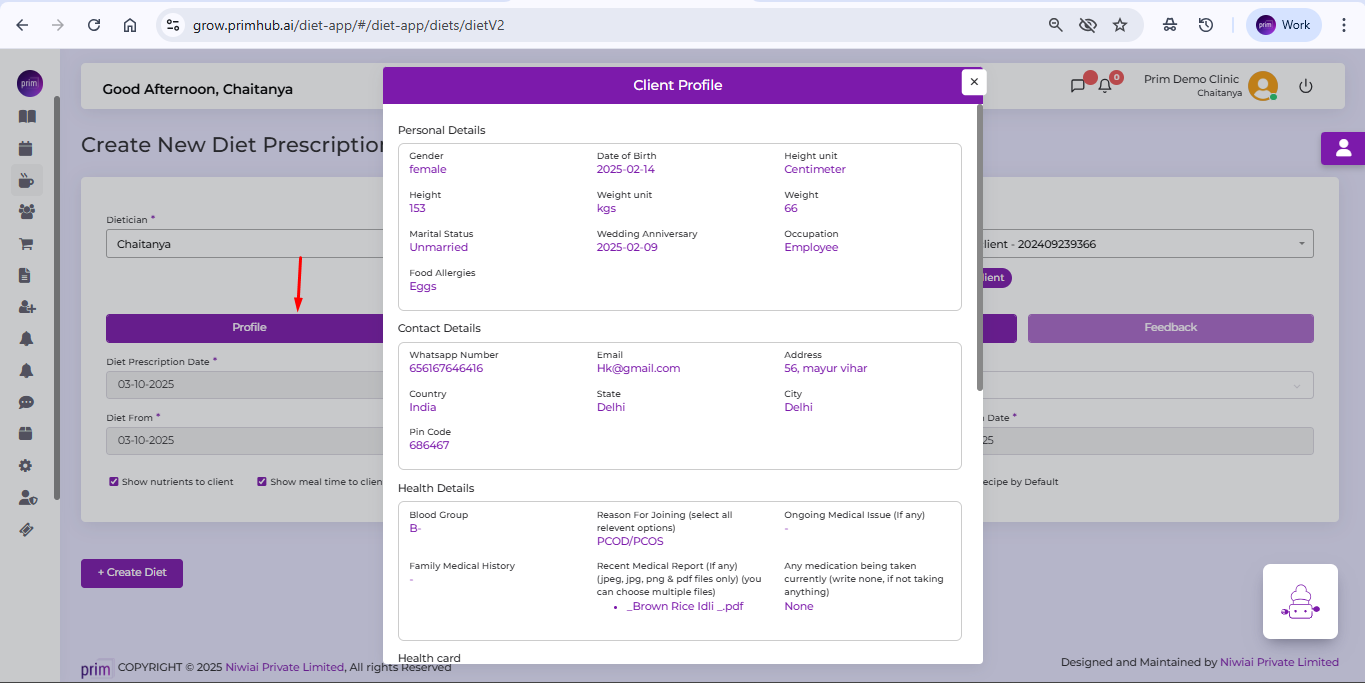
5. The Profile button displays the onboarding details from the most recently filled Onboarding form of that client.
6. The Health Progress button displays the details from the most recently filled Health Progress form of that client.
7. If any notes are added from the dietitian, they will be shown.
8. Any feedback provided by the client will also be displayed.
9. The diet prescription defaults to the current date but can be changed (mandatory).
10. Filling in the current weight and weight unit fields is optional.
11. Diet From defaults to the current date but can be changed (mandatory).
12. Diet To defaults to a 7-day gap from the start date but can be changed (mandatory).
13. Next Session Date is automatically set to the same date as the Diet To field.
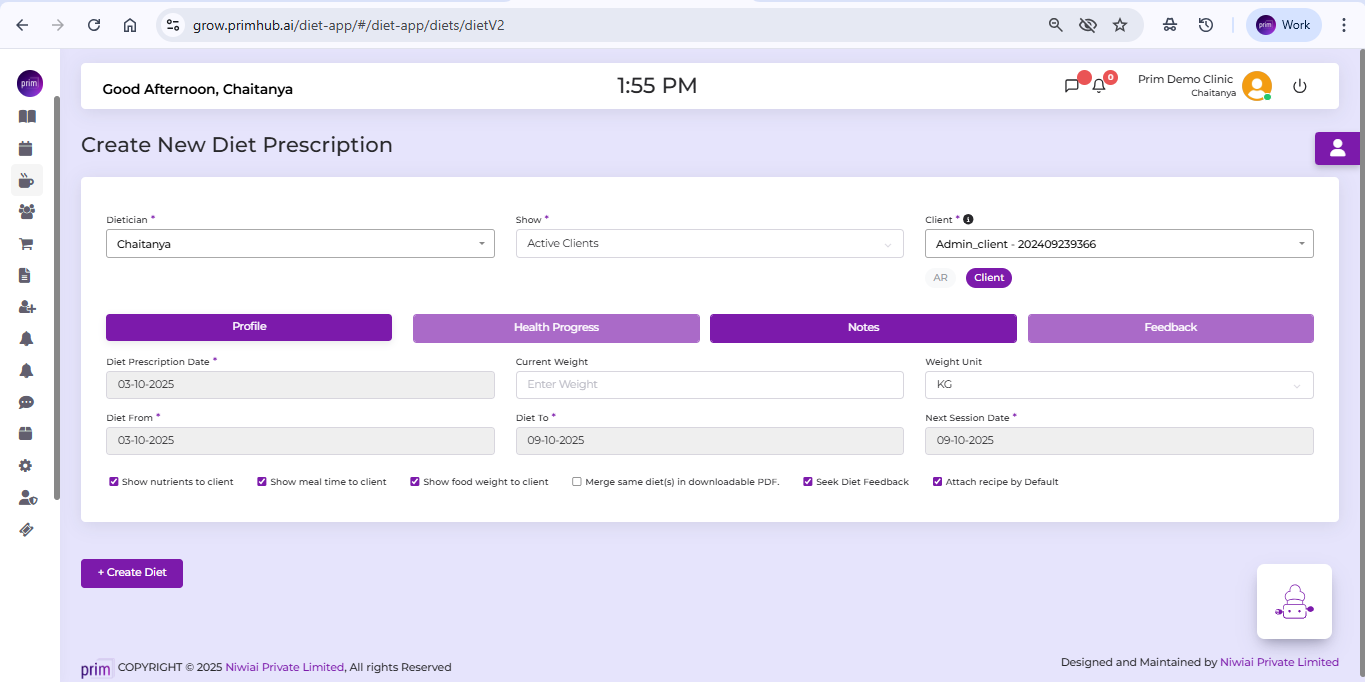
13. Show Nutrient to Client: If unchecked, the generated diet will not display nutrient values to the client. However, you can still view them while creating the diet.
14. Show Meal Time to Client: If unchecked, meal times will be hidden for both the client and the dietician.
15. Show Food Weight to Client: If unchecked, the food weight will be hidden for both the client and the dietician.
16. Merge Same Diet(s) in Downloadable PDF: Allows the merging of diet details into a single PDF format.
17. Seek Diet Feedback: Displays a feedback button in the PDF, allowing the client to provide feedback.
18. Show shopping list in Diet Pdf
19. Attach recipe By Default: It automatically attaches recipes when selecting food while creating a diet plan, so the recipe is linked by default instead of attaching it manually.
20. Click the Create Diet button to finalize the diet for the client.
21. Select dates for the diet, and the color of the selected dates will change. You can select multiple dates or choose the 'Select All Dates' option (mandatory).
¶ Search
- Click Master Diet: Contains all master diets. Search by diet short name or client name.
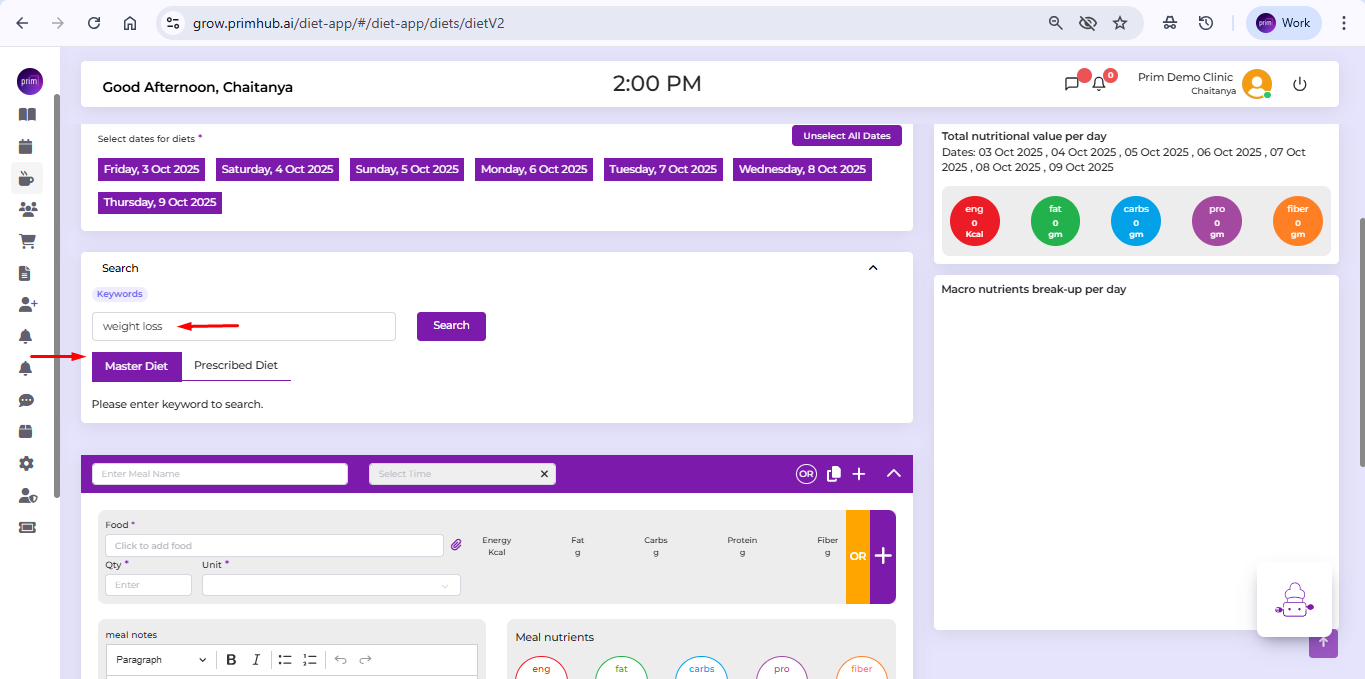
2. Click Prescribed Diet: Contains all prescribed diets. Search by diet short name or client name.
3. Click the Search button to display the details.
4.Select a client and click the Add (+) icon, the diet will display upon clicking the icon.
5. To copy a diet, click the Copy icon, the copied diet will automatically display and can be edited or modified as needed.
¶ Add Diet
- Select a meal name (e.g., Breakfast, Lunch, Dinner, etc.) from the dropdown. You can also add custom meal names, such as “Post Zumba Meal,” by entering them in Enter Meal Name.
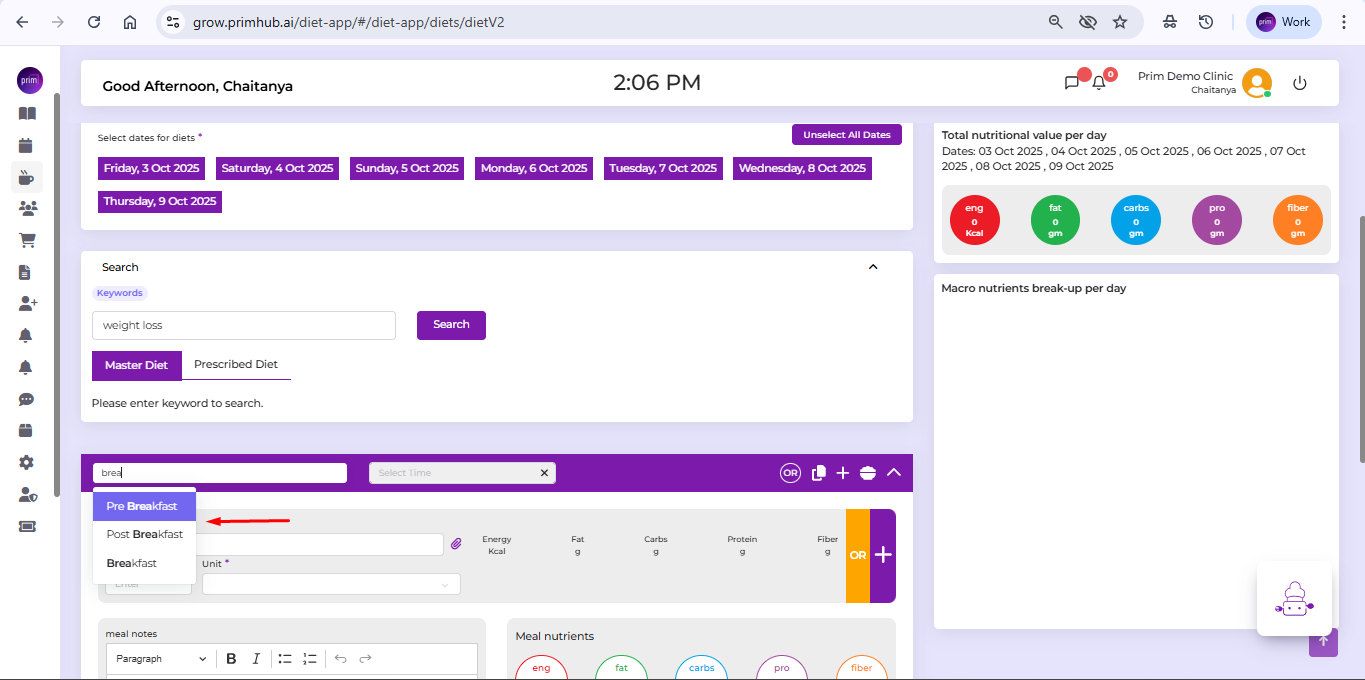
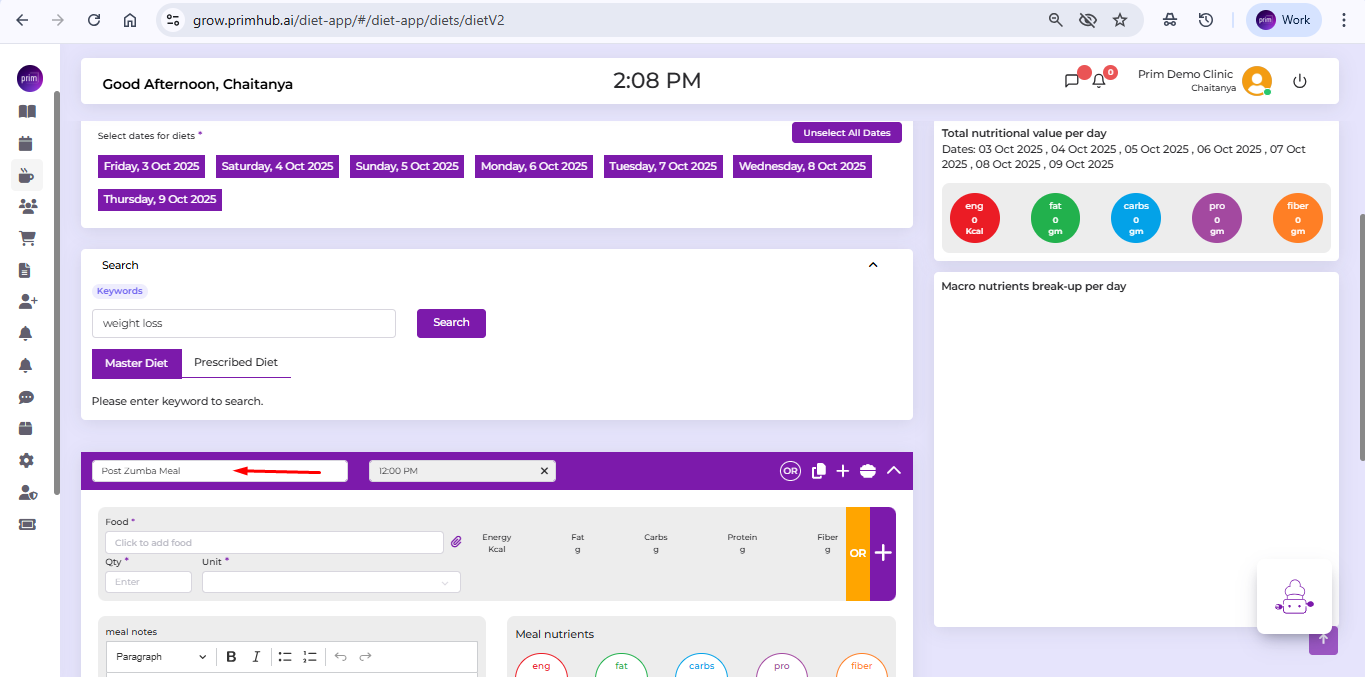
2. The meal time will be automatically added but can be changed.
¶ Icons and Their Functions:
1. Alternate Meal Icon (or): Adds an alternate meal.
2. Move Down Icon: Moves the current meal down, swapping positions with the one below.
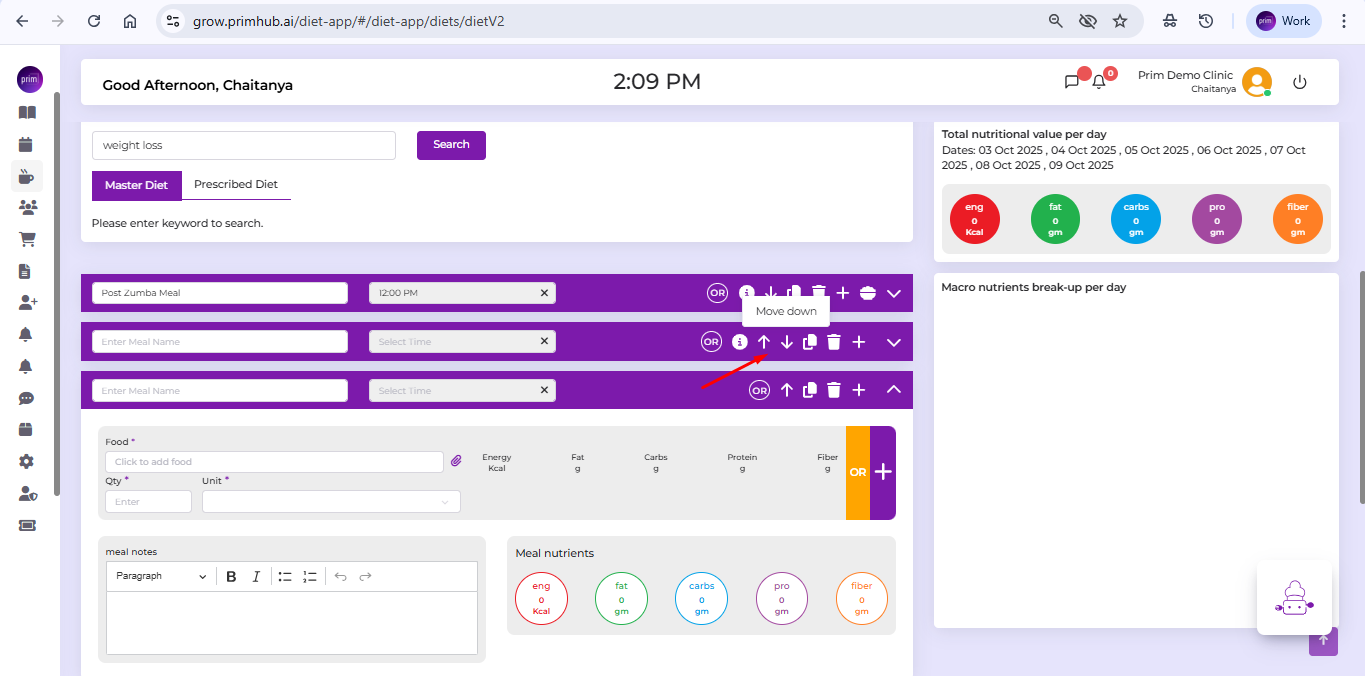
3. Move Up Icon: Moves the current meal up, swapping positions with the one above..
4. Copy Icon: Duplicates the current meal, generating a copy directly below.
5. Delete Meal Icon: Deletes the selected meal.
6. Add Meal Icon (+): Adds a new meal section for adding additional meals.
7. Copy Meal Icon: Copies the meal, allowing it to be pasted onto other days if required.
8. Collapse Icon: Collapses the meal section for better organization.
¶ Food:
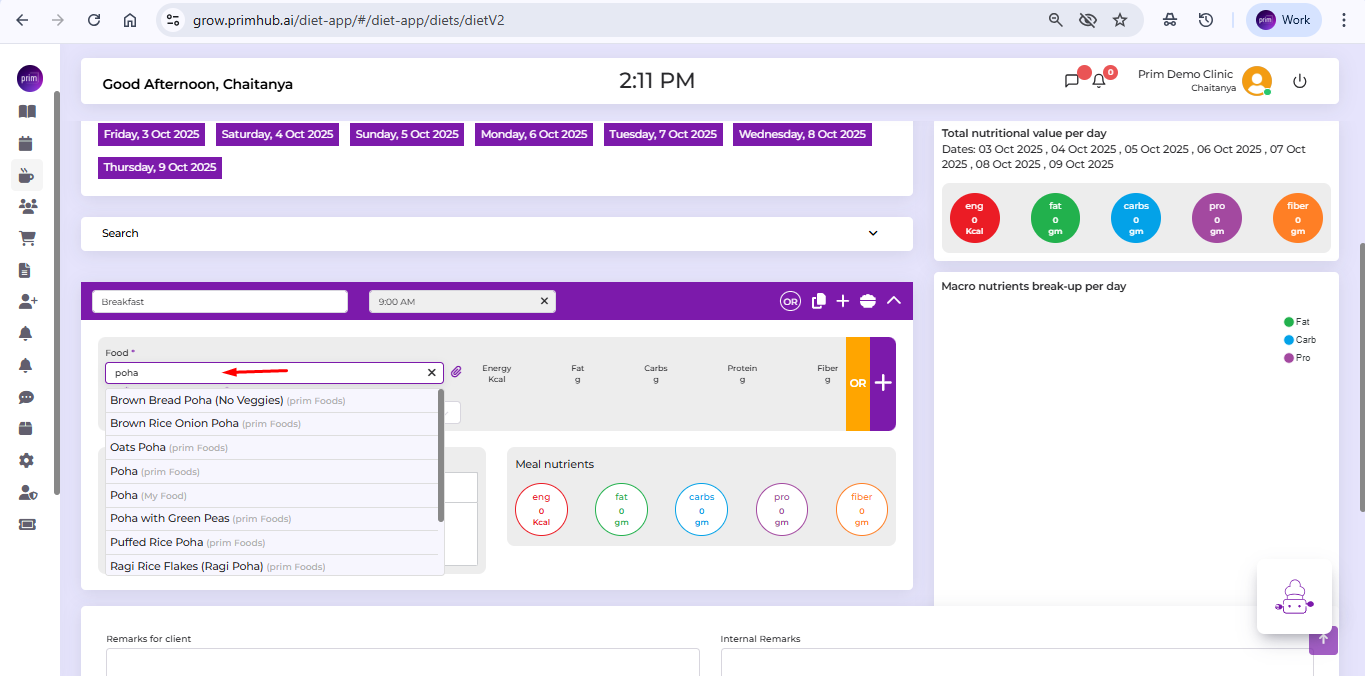
- Select food from the dropdown. Quantity, units, and meal nutrients are calculated by default when food is selected. Quantity and unit values can be changed as required.
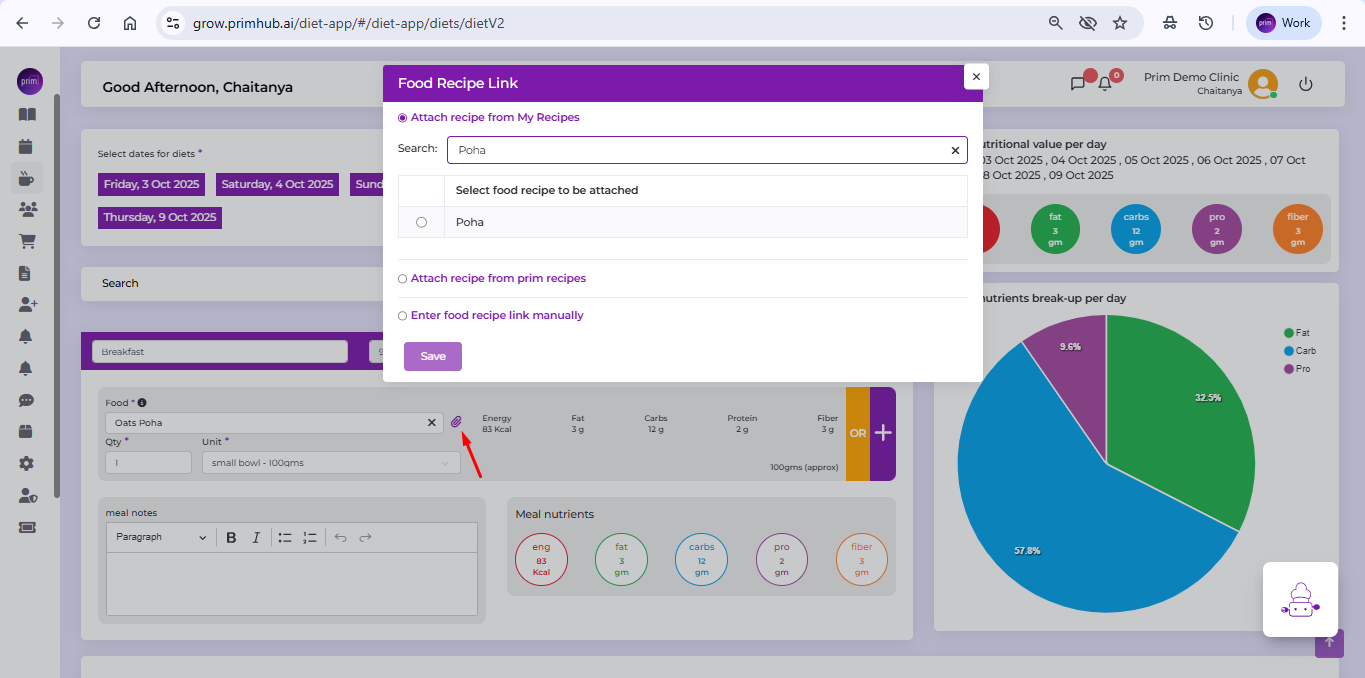
- The Recipe Link Icon is available after the food section. Click the icon to attach a recipe from My Recipe, Prim Recipe, or manually link a recipe. Save the link to associate the recipe with the food.
3. The Meal Note option is available, allowing you to add detailed notes for the meal.
¶ Features include:
- Styling text as a paragraph or heading.
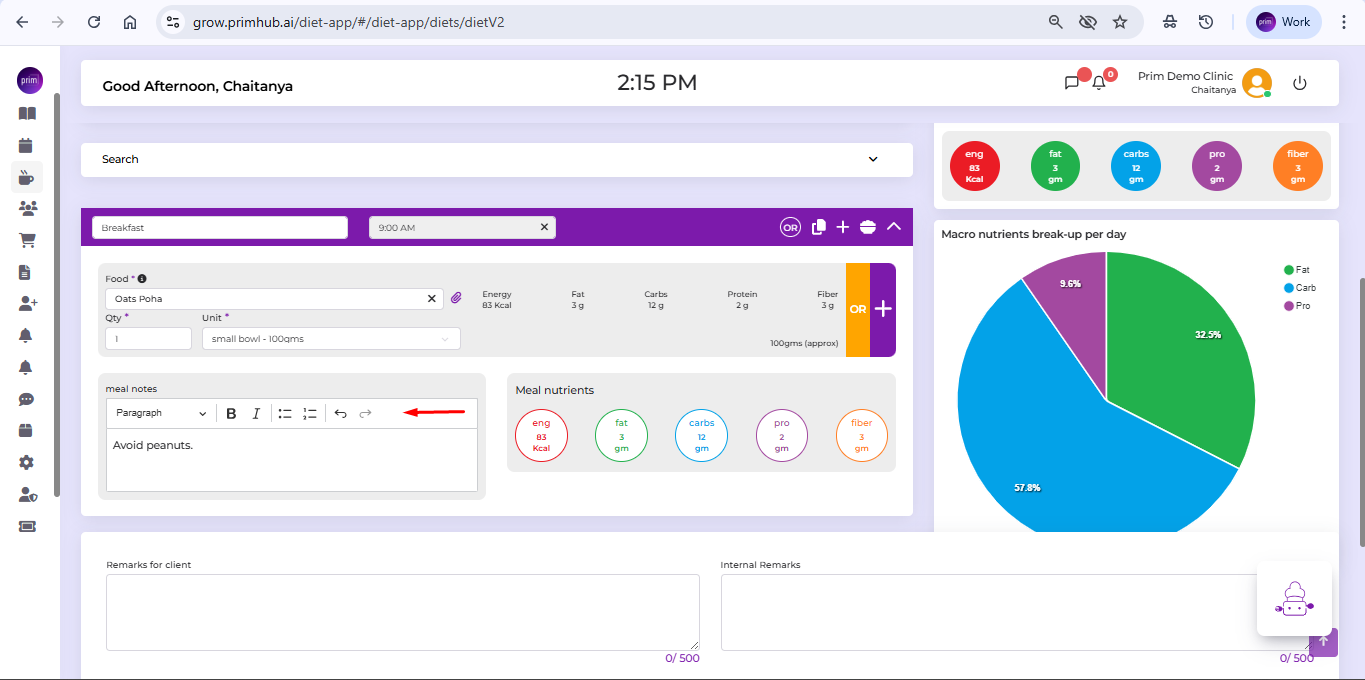
2. Applying bold or italic formatting.
3. Adding bullet lists or numbered lists.
4. Using the Undo/Redo Icon to revert changes.
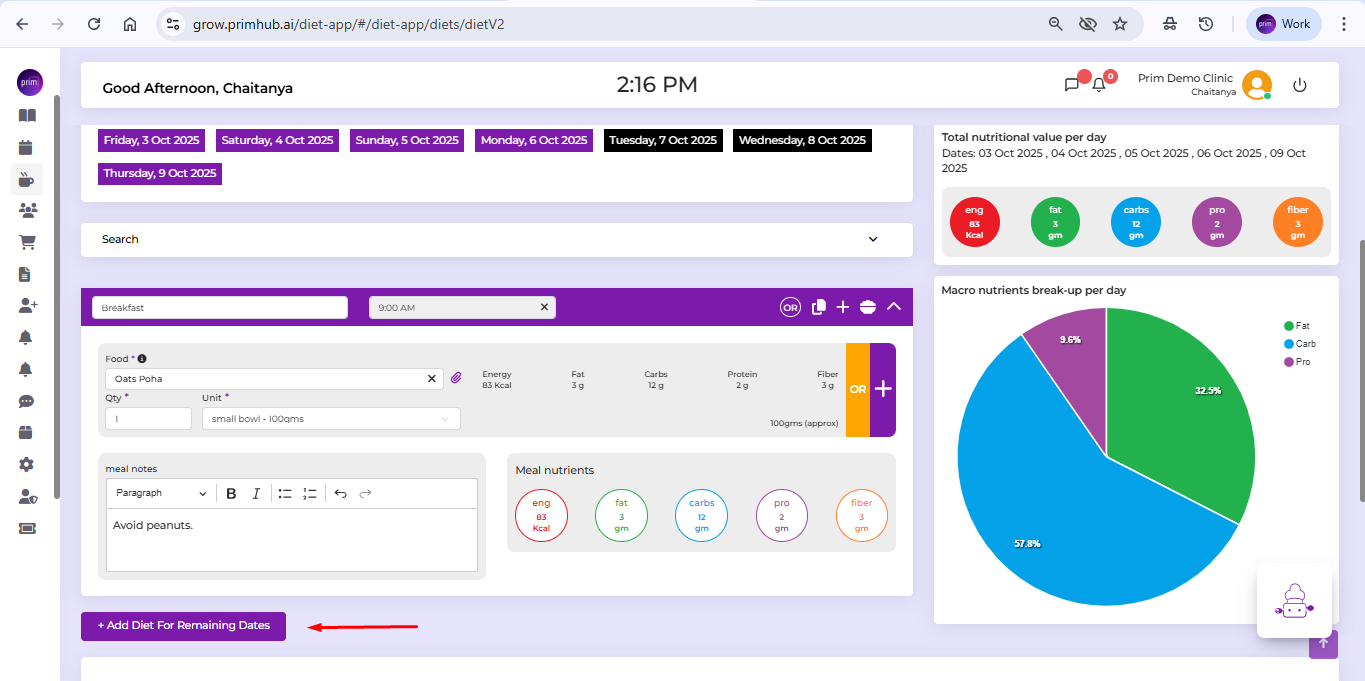
5. The 'Add Diet for Remaining Dates' button is displayed when adding a diet for other days. It can be deleted if required.
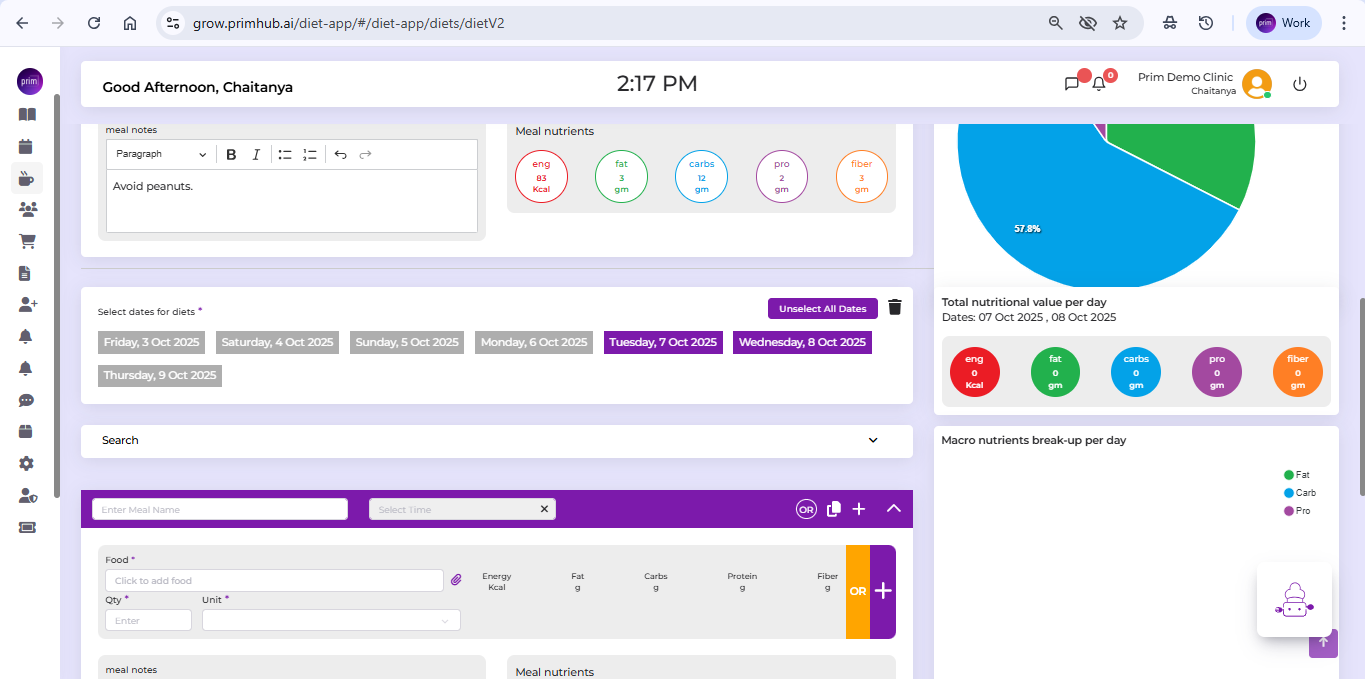
6. Select the dates for the remaining days. Follow the same steps as before, including searching for the diet, selecting the meal, choosing the food, and attaching the recipe.
7. Total nutritional value per day represents the daily nutrient breakdown. Includes values for energy, fat, carbs, protein, and fiber with selected dates.
8. Displays macro nutrients break-up per day in a pie chart.
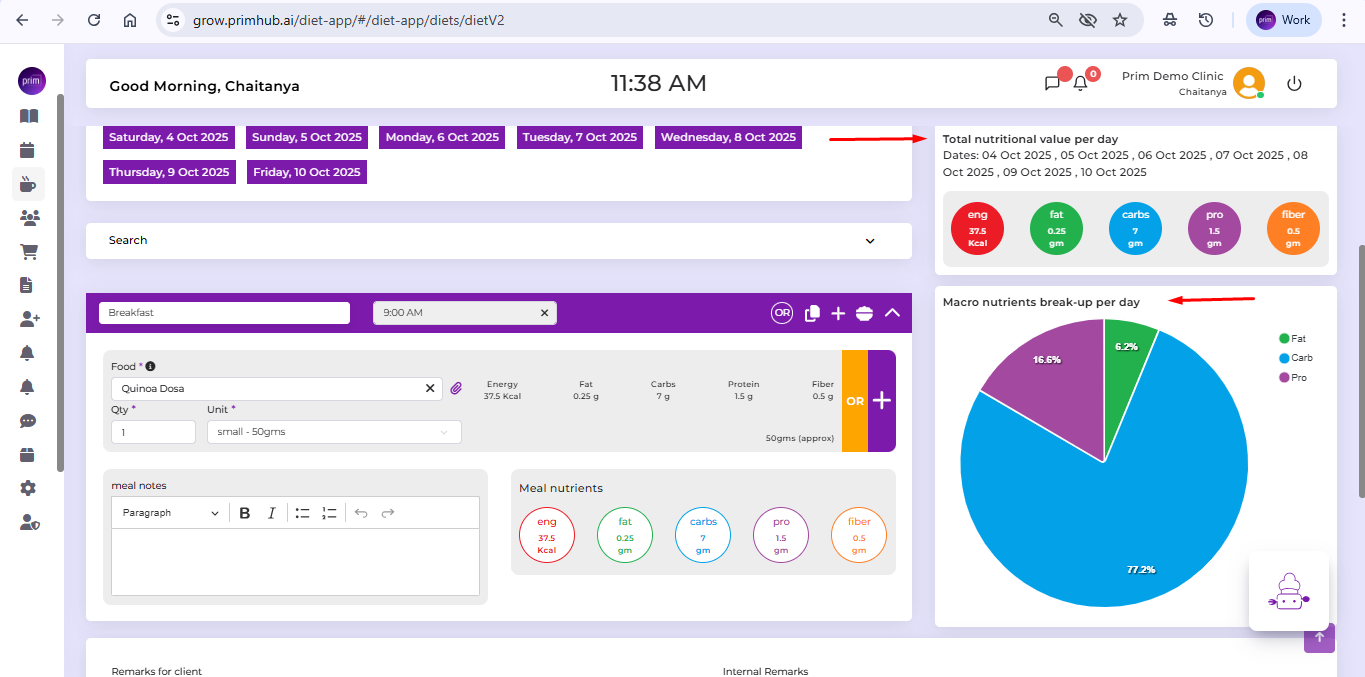
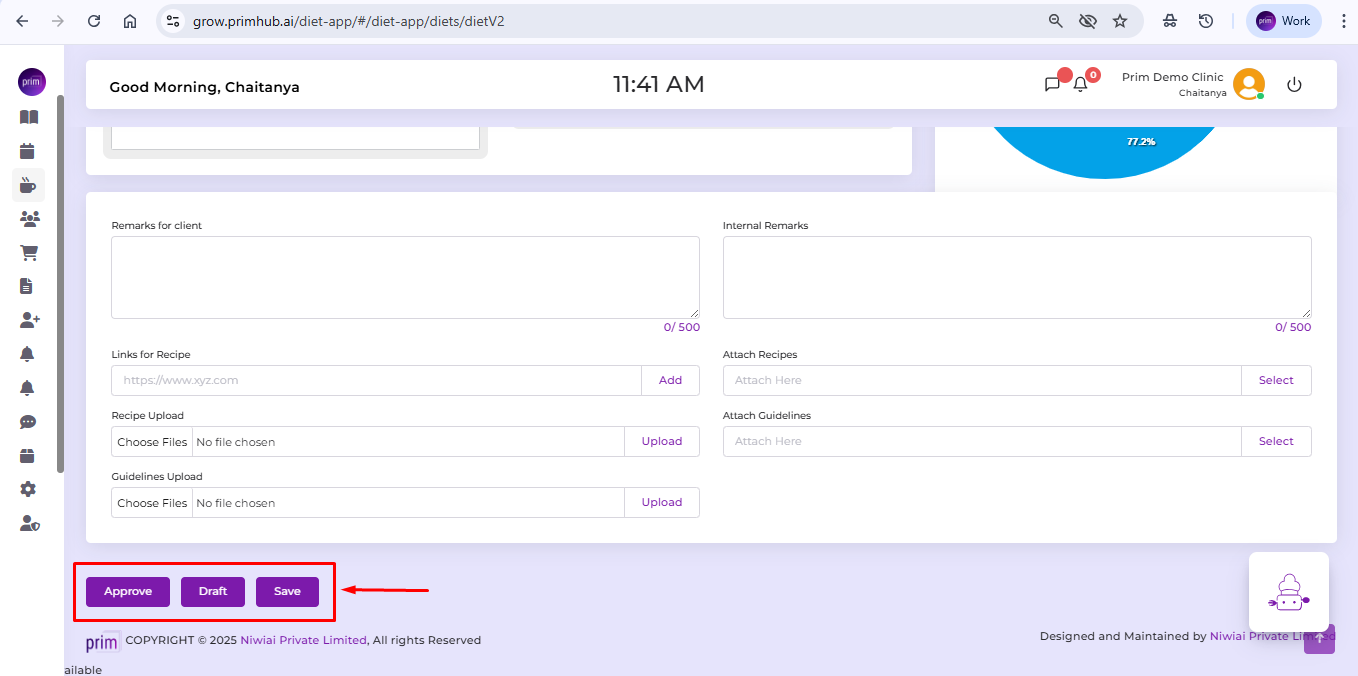
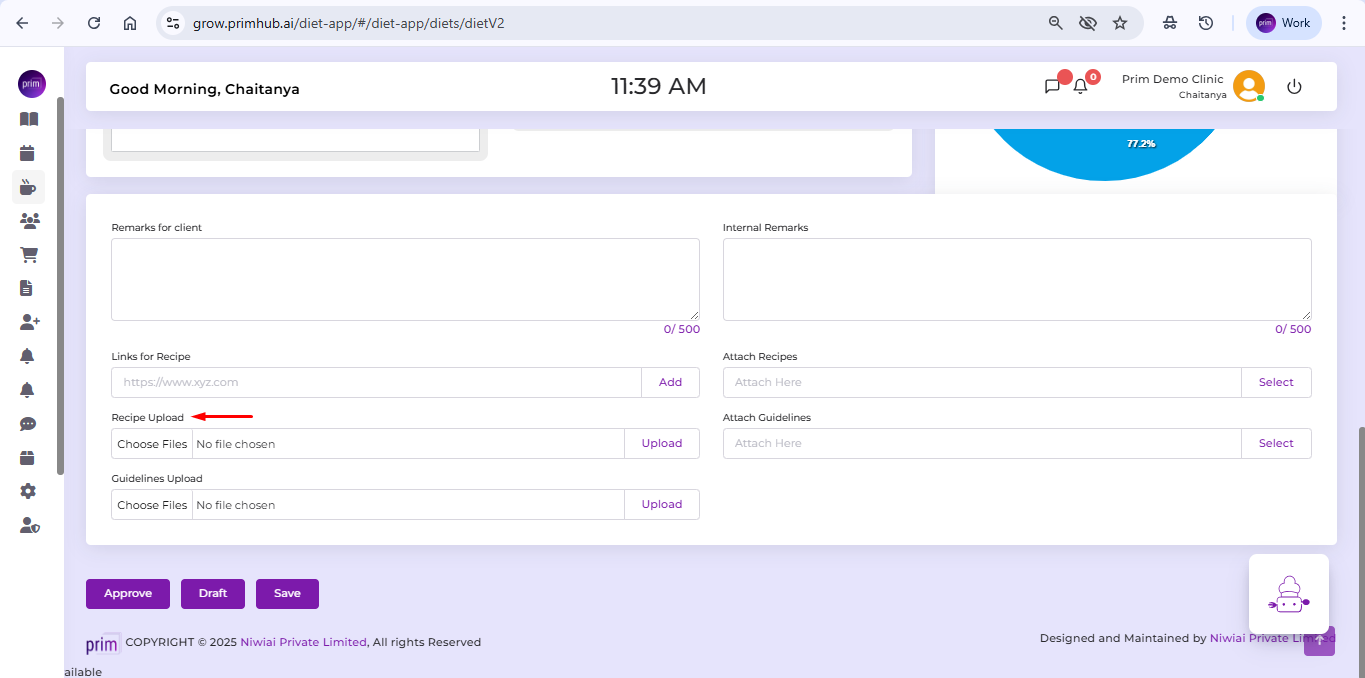
9. Remarks for Client field is used to provide remarks to the client, while the Internal Remarks field is for the dietician to add internal notes.
10. Add a recipe link from online sources or YouTube by pasting the URL in the links for recipe field.
11. Select and attach recipes from the internal recipe collection.
12. Upload recipe in PDF format from your computer, mobile, or other devices and upload it.
13. Attach Guidelines:
- Click Attach Guideline and select a guideline from the dropdown menu.
- Specify the applicable dates.
- Use the Add New button to create additional guidelines.
- Click Attach to finalize.
14. Guideline upload in PDF format from your computer, mobile, or other devices and upload it.
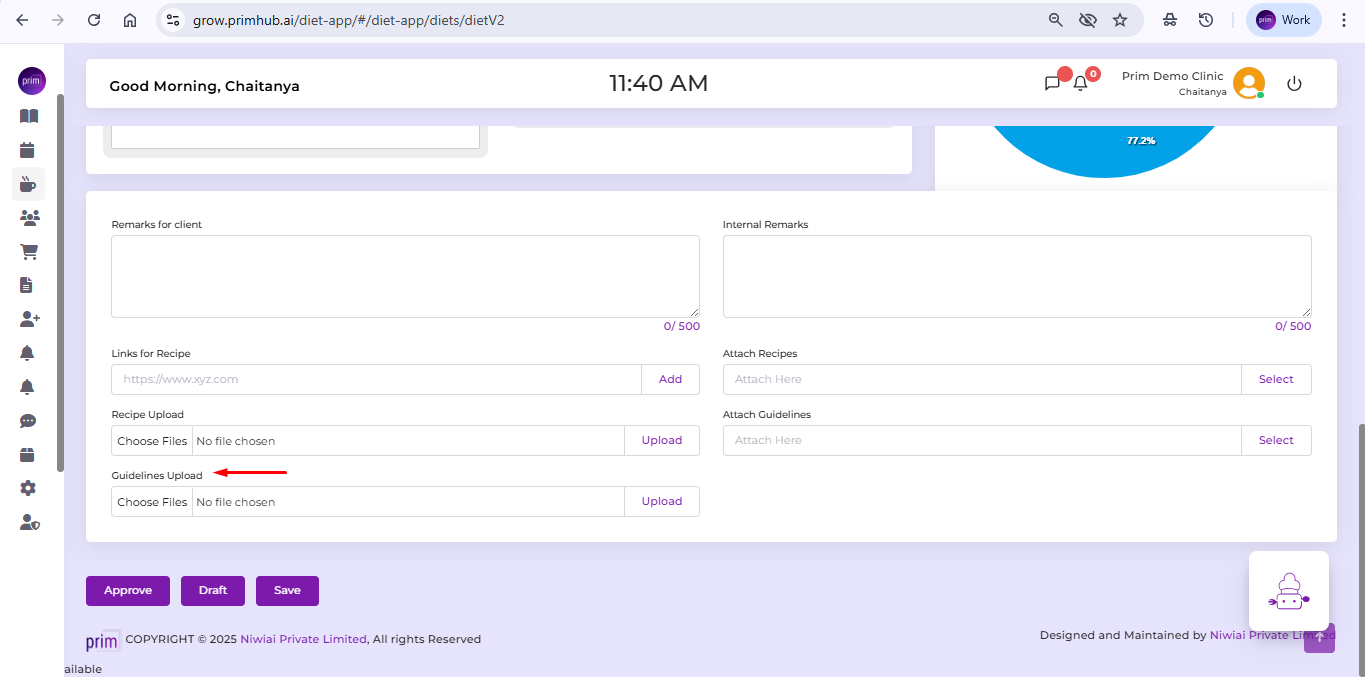
15. Approve button is used to finalize and send the diet to the client.
16. Draft button saves the complete diet but keeps it in draft status without approval.
17. Save button saves progress at any stage, whether the diet is fully completed or not.